Wednesday, October 15, 2014

Burlap Prints for Your Big Day!

I'm SO excited to share my new line of wedding prints with you!  My little sister is getting married in the summer and I was inspired to create these new prints.  I've had so much fun designing them.  I hope you enjoy them too!


Monday, September 29, 2014

DIY Upholstered Headboard

My little man recently moved from his toddler bed to a queen bed.  I can't believe my baby (almost 3 year old) boy sleeps in a queen-size bed!  I decided to make him an upholstered headboard.  To make it extra special, I wanted it to be monogrammed.  My sewing machine doesn't have the capability to make a monogram large enough for a headboard, so I enlisted help from a great local business, West End Monogram.  They've done work for me before and they're fantastic!

Here's the finished headboard!  I'm in love!  I'll say it again -- my kids' rooms are by far my favorite rooms in our home.
(The quilt and sheets are from Pottery Barn Kids.  I made the chevron pillow and artwork.)


Supply List:

  • Fabric (I used 2 yards of duck cloth that I purchased at Hobby Lobby with a 40% off coupon!)
  • Plywood (I bought mine from Lowe's and they cut it to size for me. My measurements were 36"x 62"x 1/4".)
  • Twin size egg crate foam (I bought mine at Target.)
  • Staples & Staple Gun
  • Hangman 18" Picture Hanging System (I bought this at Lowes for $11.  It can hold up to 200lb.)
Let's get started!
  1. Have the fabric monogrammed.  You'll need to mark the spot on the fabric where the monogram should be located.  I went with a 10"x 10" monogram.  The top of the monogram was 7" from the top edge of the fabric and the monogram was centered across the width of the fabric.
  2. Lay the egg crate foam out on the floor (with the textured side up).  Lay the piece of plywood on top of the foam and try to center it on the foam. 
  3. Pull the foam around the plywood and staple it working from the middle to the corners and pulling it tight as you go.
  4. Mark the middle point of the plywood.  For me, this was 31" from each side.  I measured and then drew a line at the midpoint using a sharpie.  
  5. Iron the fabric.
  6. Lay fabric facedown on the floor and mark the middle point of the fabric.  I used a piece of chalk to make a small mark at the edge of the fabric.  Make sure this point is at the midpoint of the monogram.
  7. Make a few chalk marks 4" from the top edge of the fabric.
  8. Lay the piece of foam covered plywood on top of the fabric (foam side down).  The edge of the plywood should line up with the chalk marks which are 4" from the top edge of the fabric and the midpoint of the plywood (sharpie mark) should line up with the midpoint of the fabric/monogram.
  9. Wrap fabric around plywood and staple.  Work from middle to edges.  Pull tight along the way.  Wrap fabric like a package to make clean corners.  
  10. Attach Hangman Picture Hanging System anchor to the back of the plywood.  Make sure it's level.  
  11. Attach the other piece of the Hangman Picture Hanging System to the wall and hang the headboard!  


Monday, September 15, 2014

It's (almost) Fall, Y'all!

Fall is hands down my favorite season and I know I'm not alone in that sentiment!  So, I just can't wait to start decorating for fall.  I'm proud whenever I can force myself to wait until after Labor Day to make the big switch from summer to fall.

Here's my new chalkboard for the season:

I enjoyed making that one so much that I decided to decorate Little Man's chalkboard (we painted the back of our kitchen counter with chalk paint so Little Man would have a large canvas at just the right height).  I didn't get too fancy with this one because I knew Little Man would pretty it up as soon as he woke from his nap.  But, you've got to love those toddler scribbles!  And, after all, I am the one who hijacked his chalkboard.


Before
After
I've also been working on some new fall-inspired burlap prints for my shop.


Thursday, July 24, 2014

My Favorite Etsy Shops


I'm not just an Etsy seller.  I'm also an Etsy shopper.  I have found some great shops over the last few years that offer fantastic personalized gifts, home decor and children's clothing.  Most shop owners are eager to assist you and open to customization.  Today, I'm going to share a few of my favorite shops with you.


This shop makes embroidered children's clothing and accessories.  I ordered my little man's preschool tote and some adorable monogrammed bloomers for my little lady from StitchedbyStephanieP and I couldn't be happier with them.  They're great quality, very affordable, shipped quickly, and so cute!

This shop makes personalized clothes hangers.  I ordered one of these for a good friend who's getting married and they are now my go-to bridal shower gift!

Etsy is not just a great place to buy finished products, but also to find fantastic craft supplies.  Among lots of other great things, this shop offers tissue paper in a rainbow of colors.  They have many colors that are hard to find elsewhere.  I bought this fantastic coral tissue paper to make pom-poms for my little lady's nursery.

This is another great craft supply shop.  I bought this kit and now my little lady has a headband to match every outfit.  The quality was great and the kit arrived very quickly.  The shop owner even let me swap out one of the colors for red.  This kit also makes a great baby shower activity.  Each guest makes a headband for the new baby.

Reese Witherspoon once said, "My rule is, if it's not moving... monogram it!"  I couldn't agree more. This shop offers high quality vinyl decals including monograms.  I used one in my own home and I love it!  It looks like it was painted on the wall.


Thursday, March 27, 2014

Hello, Spring!

In my neck of the woods, we had a lot of snow this year so I'm very excited that spring is finally here!  I decided to give my living room a quick refresh for spring by updating some cushion covers. 


First, I made new envelope pillow covers for the black & cream damask cushions on my couch.  The new fabric is called Emory Tangerine.  I bought it at my favorite local fabric store, U-Fab (they have an online store so you don't have to miss out if you're not local to Richmond).

BEFORE
AFTER
 
Next, I recovered the seat cushions of my rattan chairs in the same fabric.  I love how the tangerine breathes new life into the whole room.  If you'd like to make new covers for your seat cushions, check out this great tutorial from the Shabby Creek Cottage.
  
BEFORE

AFTER


Thursday, March 13, 2014

11 Budget Friendly Organization Ideas


1. Ikea Expedit for Toy Storage.  I covered a piece of foam core board in a cute chevron fabric and attached it to the back of the Expedit unit with screws to add a pop of color and to prevent toys from falling behind the shelves.  Then I made these matching labels using this free printable and attached them to the fabric bins with metal snaps and the plastic bins with stick on Velcro/ribbons.

2. Ikea Ribba picture ledges for children's book storage.  Books are on display, not hidden, making them more accessible to little hands.

3. DIY fabric storage bins for changing table.  I used this fantastic tutorial to make the storage bins on the changing table.  I winged the fabric inserts for the wire baskets on the wall.

4. DIY magazine files for mail sorting.  I used mod podge to cover these Ikea Flyt magazine files and I added these cute chalkboard labels that I made using this free printable


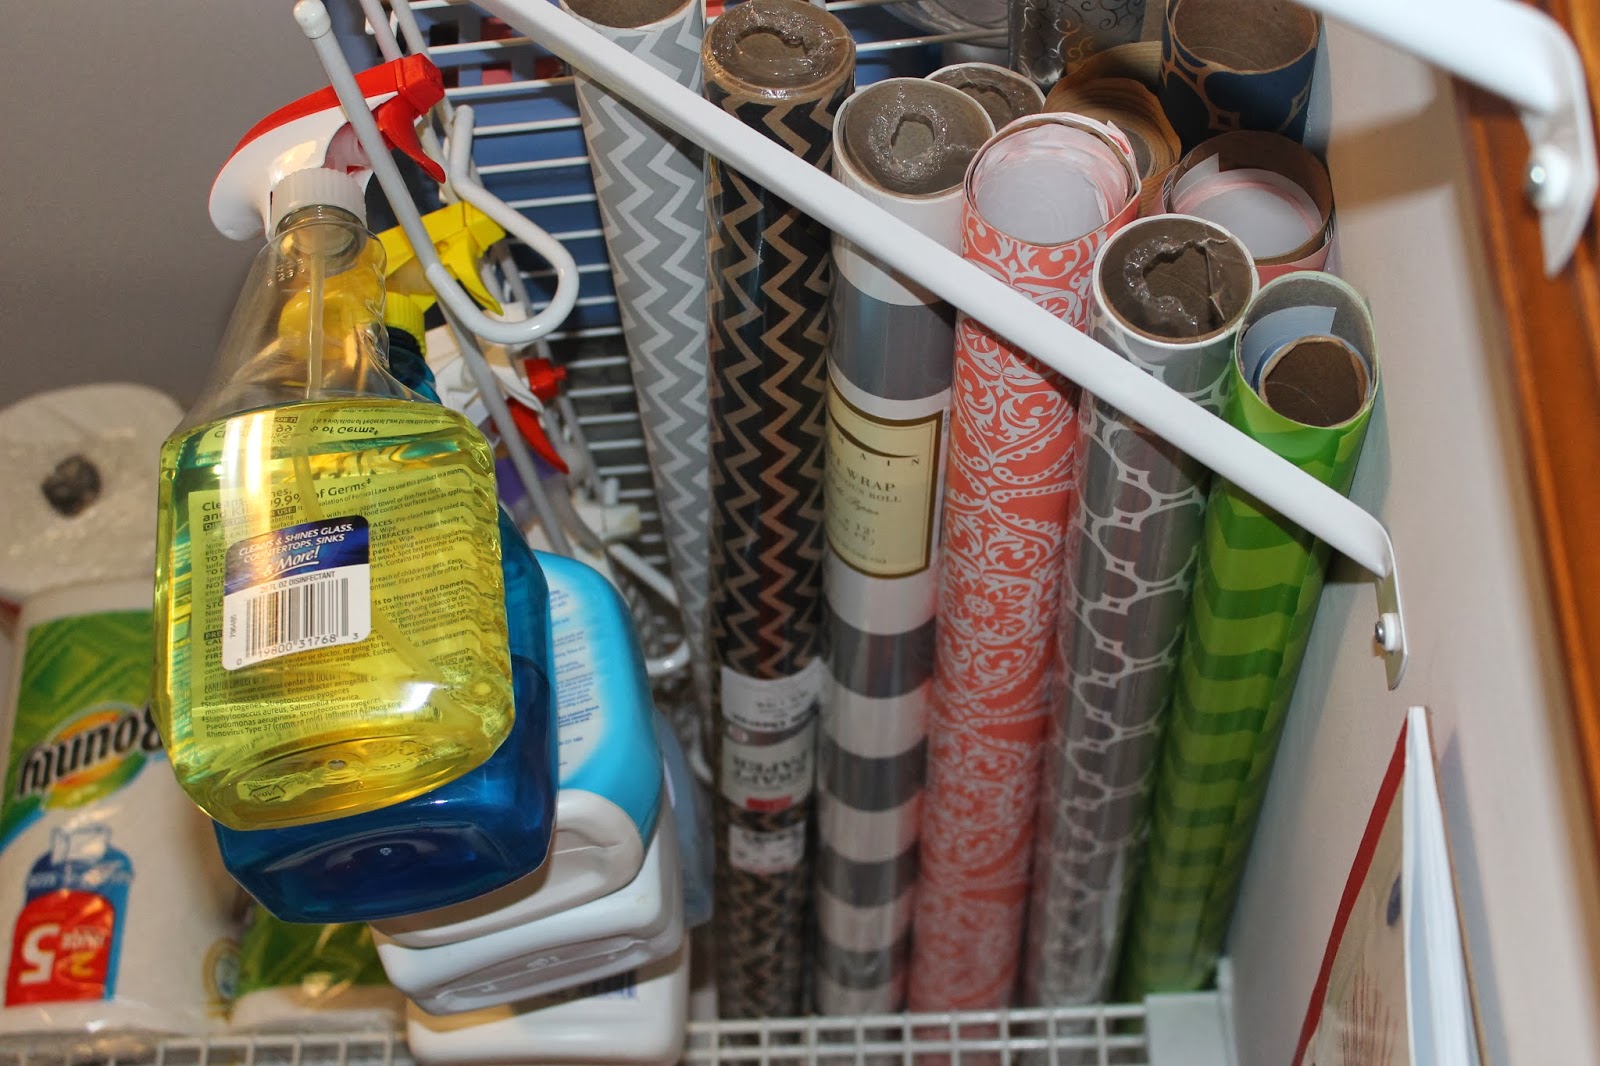
5. Store wrapping paper rolls within the brackets of existing wire shelves.  Most of us already have these hanging in closets/laundry rooms so this storage solution is completely FREE!

For dual purpose storage, hang spray cleaners from existing wire shelves. 

6. DIY fabric wall pockets.  I made these wall pockets with some leftover fabric to hold paper items in my craft cabinet.  Tutorial coming soon!

7. Store DVDs in baskets and label each basket with genre.

8. DIY Duplo table from Ikea Lack Table.  My friend gave me this great idea.  I just glued a Duplo base to the top of the Ikea Lack table and then added drawer slides from Lowes and an Ikea Trofast bin as a drawer to store the Duplos.  Total cost under $30! 


9. Shoe bags to store cleaning and personal care products.  These handy shoe bags are on the backs of all my closets doors and only one of them is actually used for shoes.  I store cleaning products, baby products, personal care items, and kids' are supplies in them.  
  
 10. Hang an outdoor wall planter beside the shower to hold washcloths.  I picked this one up at a local consignment store for under $10 and painted it with oil rubbed bronze spray paint.  It's so convenient to have the washcloths right beside the shower.
  
 11. DIY closet divider labels.  I mod podged cute patterned scrapbook papers to flat balsam wood ornaments to create these labels.  I cut the numbers out using my Cricut machine and attached them using mod podge.


Sunday, February 16, 2014

Nursery Reveal!

We're expecting our second child, a little girl, in April!  I have been working on her nursery for a while and it's finally done.  I'm so excited to reveal it.  I hope you enjoy!  I've included a source list for most of the items but if I missed anything, feel free to post your questions!


Source List:


Check out www.eastcoastcreativeblog.com!

The 36th Avenue